Contented

More specifically Sherwin Williams Contented.  As is the paint we picked out for one of our guest rooms.


Sherwin Williams runs a 40% off sale every now and then, and we happened to see an ad that it was going on a few weekends ago.  We had been debating paint colors for the upstairs for a while and the sale made us decide to bite the bullet and pick a color.  I was sick of the builder beige anyways.  Contented is a color I have pinned a few times before and it’s a nice cool neutral (like the rest of the house) that will work well for a guest room or possible future kids room.  We went with SW Harmony Interior Acrylic Latex paint in an eggshell finish because it is a zero VOC formula (no fumes) and has extra durability/washability.

While there we also picked up a few gallons of Anew Gray for the bonus room.


WP_20140720_003

Supplies used (from top, clockwise): roller extension poll, i-pad/pandora (tunes are a must have!), disposable roller tray liners, cordless drill, rags, roller wand, painters tape, roller covers, 2″ angled brush, & paint cup.  See below for our reviews/recommendations!


WP_20140720_004

We started out by clearing the room: taking off the linens and pushing the bed to the middle of the room, removing the curtains & hardware, removing all outlet covers and light switch plates, taking down the blinds & hardware.  Luckily this room was pretty sparse so this step didn’t take long.


WP_20140720_005

Next we caulked/prepped a few areas that needed attention.  There was a space where the trim over the closet door didn’t meet the wall and the window had some drywall cracks that were previously hidden by the blinds.   Just make sure to use paintable caulk and wait the recommended amount of drying time before painting over it.  In this case we did everything else first and painted these areas last.  We also used a putty knife to pop off a few paint drips the builders had left.


WP_20140720_022WP_20140720_011

Then it was time for taping.  I used ScotchBlue Edge Lock painters tape to tape off the baseboards and any tight spaces (like the closet door trim).  This tape worked great with no seepage except in one area where I didn’t press it down firmly enough.  After testing my steadiness I decided to leave any open vertical spaces and the ceiling un-taped because I could cut right in with a clean line without the extra effort of taping off.  I used a 2″ angled brush from Wooster for this process and I looooved it.  My advice would be to get a good quality short-handled angled brush like this, tape a section off, and try your hand.  Chances are you won’t even need tape in most areas.

Here is a great cutting-in tutorial from Sherry over at Young House Love.  Seriously it could change your life ;).

WP_20140720_015


WP_20140720_013

While I cut in Matt started on the next wall and rolled.  A tip here is to use an extension rod on your roller (you can even use a broom handle withe the end removed!) even with short walls as it will save your shoulders and neck from a lot of strain.  We started on different walls and moved in the same direction so we wouldn’t be in each others way.  Matt laid down a little tarp to protect the carpet from over-spray but I just did without.  I found it was easier to just be careful than to worry about a drop cloth.


WP_20140720_007

I also got the HANDy paint cup that has a magnet to hold your brush when not in use…. GENIUS!  No worrying about dripping, needing an extra hand, or the brush falling too far into your cup.


WP_20140720_009

Our pups came to supervise while we painted.  I was a little worried about them getting into stuff but they were tired from a long weekend of playing and just fell asleep under the bed.  My hearts 🙂


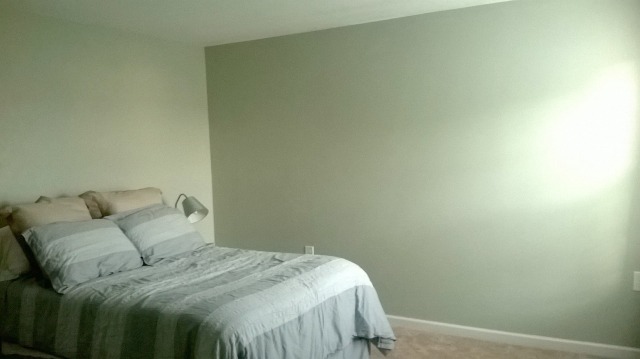
To recap, here is the room before paint…

?????????????????????????????????????????????????????


And after we put it back together (far from finished lol).  I switched the previous heavy blue curtains with white sheers I already had on hand for a lighter look.  Everything else will probably stay as is for a while.  However I love how just a gallon of paint and a few hours work can totally change the look of a room (goodbye beige haze!).

WP_20140730_007

WP_20140730_008WP_20140730_006

Love this Emily Dickinson quote.

WP_20140730_009

And yes, the black and white blur in the bottom right is Sophie & Chloe play fighting like they do all-day-every-day.


Thanks for stopping by!

Follow me!  The Stalnaker Home on  Bloglovin, Instagram, & Pinterest!

‘Falling for’ Fridays

Just a little look into the things I’m ‘falling for’ these days…


#1.  Ornamental grasses…

Give your garden four seasons of interest with low-maintenance ornamental grasses. Here are some of the best varieties.

Matt and I are planning on mulching the back bed this weekend and then would come planting/landscaping.  I love the look of ornamental grasses but haven’t convinced him to join me on the bandwagon yet.  However thanks to our neighbors new privacy fence I did get the ‘ok’ to put a raised vegetable bed in our newly hidden side yard so I’ll take what I can get.


#2: This song

Seriously can’t stop playing this over and over again (luckily Matt likes it as much as I do!).  Granted the music video is a little weird but it’s an homage to Robert Palmer’s ‘Simply Irresistible‘ video and kind of a farce (read more about it here).  LOVE it!


#3:  This TV show…

It’s HGTV’s newest show Flipping the Block, about four teams who have to renovate condos while living in them… and the conditions are nasty!  The first episode was this past week and I’m hooked.  My girl Nicole Curtis from Rehab Addict is one of the judges (love her!) and it’s pretty crazy seeing what all can be done in a few days.  Plus it’s nice to have something to watch when we veg out at nights since all our regular shows are on hiatus for the summer.


#4: Sliding/Barn doors…

narrow, sliding door..

upstairs bath door ideas

We need to do something about the door on our upstairs bathroom.  It opens into the room which is pretty narrow and makes it impossible to get to the bath/toilet while to door is open.  I’m thinking a pocket door might be the way to go (if we have room in the wall) but I’m also digging the sliding/barn door look.  Trouble is our wall space is limited so it would probably have to be something custom-built but I’ve found a couple of tutorials and just might do it…. maybe :).


#5:  This printable…

Hebrews 6:19 Printable from Elegance & Enchantment and The Thinking Closet

You know I love all things sea-inspired so this anchor printable from The Thinking Closet (shared on Elegance & Enchantment) is perfect.  Also I love free art, and you can too!  Just click the link at the bottom of her post to download your own printable copy.


So that’s what I’m falling for this week!  What are some of the things you’re falling for?

Edgy

Things just got edgy around here. Not because we did something radical or envelope pushing but because we did a little landscaping… specifically we added edging stones to all our beds (see what I did there?).

20140722-215509-78909824.jpg

Aren’t they pretty?

Our lawn is Bermuda grass which grows really well in our hot humid climate. Too well actually. It is pretty invasive and sends out these long ‘runners’ everywhere… Including into our mulched beds. I did realize how much it had grown in until we started edging the beds to prepare for the stones. I pulled hundreds of two/three foot long runners out of our beds that were actually growing right up under the pine straw and putting down roots.

image

We edged the beds by creating a trench a few inches wide around the perimeter of the beds using an edging tool. Then we added back a little dirt and some sand to level out the trench. Sand is key here in getting your stones to lay even, it is way easier to play with than dirt. We just used all purpose sand from the outdoor section of lowes. For our all of our beds it took about 2 1/2 bags.

image

Our yard and mulch bed in front of the porch actually slope downward. We chose to follow the slope of the yard and not build up a level wall here. So for this part I just ran my hand over the tops of the stones as we laid them to make sure they were at a uniform height compared to their neighbors. If there was a considerable difference in the transition between two stones I simply removed some sand underneath and wiggled it around until it became smooth. (I say ‘I’ for all these parts because I was responsible for placement of the stones while Matt did the carrying of supplies/pouring sand/heavy labor. It’s nice to have a man around ;)). All in all it took us about half a day from start to finish including a run to the store for supplies.

I love the polished look something so simple and easy gave our yard (now only if the backyard would catch up…)

image

And just to keep it real here is the view beside our newly beautified yard…

image

One day we will have a finished yard 🙂

Follow me on Pinterest and Bloglovin!


Boston withdrawal…

Sorry for the lack of house-related posts lately.  Matt and I took an extended vacation over the Forth of July and it was blissfully rejuvenating.

We stayed in a condo in the Belle Isle Yacht Club in Georgetown, SC (yes, yacht club, we’re fancy like that ;-)) and spent most of our days either at the community beach house in Pawleys Island or at the pool overlooking Winyah Bay.  I apparently was so relaxed I forgot to take any pictures to share except this sunset view off our balcony.  I LOVED the giant live oak trees, the spanish moss, the beautiful water.   We even saw gators in the pond one morning!  The view from the pool was more of this with palm trees.  It was so nice to spend the day at the beach and then come home to relax in the pool with this view.  Truly heaven!

WP_20140706_001


My mom and dad watched the pups for us and they are still hanging out with them as we haven’t had a chance to make the drive up to get them yet.  I missed them a bit on vacation but now that we’re home I miss them like crazy!  I told Matt it was too quiet, peaceful, and clean in our house without them 🙂  Luckily we are meeting my dad halfway tonight to get them back AND getting to keep their Boston Terrier Dixie (Chloe’s sister) and Jack Russel Bandit for the weekend.

Luckily my mom sent me lots of pictures of their shenanigans while away to get me through…

V__5464 V__4CB0 V__F539 V__CF68 V__3801 V__47AC V__86BA  V__EF60 V__54ED

As you can see they had a great time going for walks, swimming, sunning, playing, sleeping, destroying, and general being Boston Terribles.  Major props to my parents for taking on all three for two weeks!

‘Falling for’ Fridays

Just a little look into the things I’m ‘falling for’ these days… beach edition!!!


#1: These beached tones…

Coastal and Beach Decor: Coastal Decor Color Palette - Beached Tones

We don’t have a beach house but I like to pretend we do 🙂  Doesn’t this color pallet make you sigh a little in relaxation?  Love it!


#2.  These beach paintings…

John Seba-Ocean Tide

source

{coastal art} shoreline

source

great for foyer table. Coastal Art, Abstract Ocean Painting, "Into The Fog", Grey Morning at the Sea, One bird flies down the shoreline.

sold, but by this etsy artist

I have done a number of ocean paintings myself (mostly at sunrise/set) but I’m loving the more muted colors in these pieces.


#3:  This wooden beach house sign…

You can make your own with this DIY tutorial here from My Pink Life by Aimee Weaver.   I need this in my ‘beach’ house!


#4: This beachy quote…

live in the sunshine swim in the sea quote - Google Search

I have been looking for a good sea themed quote for some time for an art project I have planned for our master bathroom.  Found it!


#5:  This beachy starfish decor…

Beach Decor White Starfish Mirror -  Nautical Shell Mirror - White Starfish Seashell Mirror

source


source

Love  it

Next time we head to the beach I just might have to pick up some starfish to decorate with.  I love the look!


So that’s what I’m falling for this week!  What are some of the things you’re falling for?

‘Falling for’ Fridays

Just a little look into the things I’m ‘falling for’ these days… July 4th style!!!

#1: This red, white, & blue cheesecake cake from Recipe Girl…

Red, White and Blue Cheesecake Cake Recipe from RecipeGirl.com

YUM… I’m a firm believer that everything is better with cheesecake!  And how cute is this twist on a 4th of July dessert?


#2.  These 4th of July printables from The Blissful Bee

4th_July_Printable_Graphic

Visit her site through the link above to get the full-sized versions.  I especially love the flag bunting!


#3:  This DIY clothes pin flag wreath

Simple, cheap, & cool


#4: This DIY pallet wood USA map from all things DIY

How cool is this for a big open wall space like the stairwell (we have one as well).  Just find yourself some wood to re-purpose (or buy new), add a stencil & some paint (or freehand), hang and viola!  Huge cheap art!  I could easily see this done with all kinds of images/stencils, just pick whatever works for you.


#5:  This table design from Starfish cottage

IMG_2107

I love how simple this is, besides the flag you could easily use everything for multiple occasions.  And I might have a slight obsession with starfish 🙂


So that’s what I’m falling for this week!  What are some of the things you’re falling for?

Installing a Ceiling Fan

I have this one weird super power that I can only access while asleep.  I turn into a living space heater and emit enough radiant heat to turn our bed into a furnace.  I believe this is why I’m so cold-natured, because I give off all my warmth during my REM cycles.  (If we could harness this heat I swear our power bills would be nothing in the winter).

And all this heat means I am a miserable sleeper in the summer.   Growing up we didn’t have central air.   Summer in the south is miserable most days with no AC, not to mention unbearable at night.  I’m still not sure how we all survived (drama drama drama, I know).  I remember having a huge floor fan in my room turned on full blast and pointed pointblank at my bed.  Even on the worst nights just that rush of air movement over me was enough to eventually lull me to sleep.

We moved to a house with AC when I was in high school and I’ve lived with it ever since.  However I still think the most blissful sleep is when waves of cool air blow over me from a fan.  Up until this point in our marriage we have lived in apartments with ceiling fans.  However our new house only has overhead lights in the bedrooms.  It didn’t bother me much during the winter but as the months have gotten warmer my nights have gotten more and more restless.  Cranking the AC up didn’t help so we bit the bullet and bought a ceiling fan

WP_20140622_002

And I LOOUUURRRVVVVEEEEEEEE it.  We shopped around until we found something that fit the decor of the room (I’m working towards a white, black, & grey-blue palette with a little ‘sparkle’) and settled on the Hampton Bay Lyndhurst fan in black from Home Depot.  (I can’t find the particular color online but here is a link to it’s sister).  The black fan & blades match my leaning mirror and the crystal light shades are just beautiful.


WP_20140702_003

Look at the pretty light patterns they throw around the room!


As far as installing goes, we were first-timers (not pros!) so I won’t begin to do a step-by-step lest you follow and end up electrocuting yourself.  However there were some pointers we found helpful along the way.

1) Read the directions all the way through before starting and then read them again.  Some steps didn’t make sense in the beginning but later on in the directions they were clarified.  This way you don’t skip something that seems out of place but ends up being crucial (or second guess something and have to re-do it.  Not that I did that ;)).

2) Set all your parts out before hand to see what all you’re working with and get a cup to place all your loose hardware in.  Also go ahead and get any tools recommended out so you don’t have to keep running out for them.  We ended up using screwdrivers (both flat and Phillips head), wire strippers.

3) Have a second pair of hands.  I have heard legend of people who can install ceiling fans solo.  All I can say is you ambidextrous, incredibly flexible, super strong people must be amazing.  Most times it worked well to have one of us hold the thing while the other did the attaching/screwing/assembling.

4) Make sure your power is off… and install with plenty of daylight left.  Obviously if you are taking down an overhead light you will need another light source!  Our install took a couple of hours so time your start for plenty of daylight.  And double check that your power to the overhead box is off (at your switches) and if you’re extra paranoid you can turn power off at the breaker box.

5) Wiring isn’t that scary (or hard)!  Our instructions came with very clear directions as to which color wire went to which switch: we were pre-wired from the builder for separate light & fan switches in this room.  However some wires could be in a variety of colors, so if you don’t see exactly what the directions say it’s best to consult with someone who knows what’s going on.  In this case the wires from the box didn’t match those from the fan so we consulted Matt’s Grandpa who has lots of experience in this matter.  Worst case scenario you wire to the wrong switch, it won’t work, and you have to take it apart and try again.  (But again, I am no expert, which is why there is no tutorial to follow).

WP_20140702_001


Action shot:

WP_20140622_001


Whee!  Fan’s are awesome, and a lot easier to install yourself than you might think!


Follow me on Pinterest & Bloglovin!